Wednesday, May 16, 2012

Pie oh Pie


Its always interesting to make a pie in my house.  My brother gets angry if I mess with that which he loves.  And for my picky brother to love any food is saying something.  So when I became a vegetarian and discovered the dark secrets inside my Mom's preferred Pillsbury Frozen Pie Crusts (they stick lard in those poor crusts, lard!)  It's sad really.  When my brother discovered that I would be changing his pie, the fear of homemade pie crusts was funny really, he was a bit displeased.  However I think I won him over.... mostly.


Its my Mom's filling, she makes it, she changes it, she is in charge of it.  My responsibility begins and ends with the dough.  It is possible for me to make the filling, but it is also time consuming, trying not to cut yourself takes time.  The filling is excellent.  Many people make almost cloyingly sweet fillings, whereas this is a bit like sweeter applesauce.  Not thin bland applesauce, but a thick, chunky applesauce, one that is full of sweet spice. 

Everyone, my Mom included, is frightened of pie crust.  I understand why, I've had a few fail before, however if you pay attention to what you are doing then all should be well.  

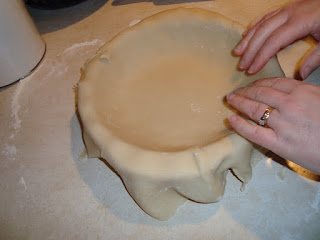
So I have step by step pictures for you, the recipe is courtesy of my favorite- The New Best Recipe
Though beware, it only makes one crust, and this my brother's favorite demands 2 crusts, though deep dish is good as well :)


Here is the recipe for the dough first:
  • 1 1/4 cup all-purpose flour
  • 1/2 teaspoon salt
  • 1 tablespoon sugar
  • 3 tablespoons vegetable shortening
  • 4 tablespoons (half a stick) cold butter
  • 4-5 tablespoons of very cold water, however you may need more to pull the dough together

Mix all your dry ingredients first, I use a food processor, but a simple bowl and spatula will work just fine.
Then you want to add in your shortening, followed by the butter, either pulsing in between the additions, or use your fingers to the point where you have gravel. Dump it into a bowl if you used the processor, otherwise start slowly stirring in the water, make sure it is frigid.  


Then push the dough, dividing evenly if you made a double batch, on cling wrap, wrap it up and place it in the fridge.  Keep it in there for anywhere from an hour to 2 days, but it must stay in for the full hour.  


Then get ready to roll!


Just make sure you have plenty of flour on hand.  Make certain everything is covered in flour, your hands, the rolling pin, the board (or counter top as my case is), and have plenty to drop onto any overly sticky parts of your dough!


(my Mom's hands as she crimps the edges, mine are always ugly)

Now the filling is simple:
  • Enough apples (any sort) to fill the pie twice as high as you think you ought to, they shrink in the oven
  • Nutmeg
  • Sugar
  • Cinnamon
  • Cloves
  • All Spice
  • Or you could just use apple pie spice, your choice
  • Juice of one lemon
  • 2 tablespoons of flour
All ratios are up to you, how sweet, how spicy, what makes it better for you.


No pie is perfect, patching is not looked down upon, unless trying to impress Grandma, then perfection may be best, however taste is all that really matters!


Friday, February 17, 2012

Simple Pasta

I was starving the other night, with a ton of home work.  Life (and blogging) will be better when I don't have school.  Summer is looking great right about now.  Summer includes the farmer's market, berry picking, and free time!  So please, bare with me until summer.  For in the summer I won't throw together ingredients and call it dinner.  However, this actually came out really good so I figured I'd post it.

Cook down some onion and garlic in olive oil, add a can of tomatoes, melt feta cheese.  Add some Parmesan and half and half to cut down on the grainy texture that the feta will leave.  You'll still have the texture, but it will be less severe.  If you like that then ignore the Parmesan and half and half, if you don't or you want to cut down the strength of the feta then go right ahead.  Adding as much or as little as you please. Add some pasta, whatever you have on hand works, and dinner is ready.  It took me 15 minutes or so.  Perfect for a rushed day, with a ton of work still to do.


Happy Birthday Haley

A month ago today was my friend Haley's birthday.  So a month ago yesterday I was baking cupcakes.  I wanted to take her favorite flavors and make them into a cupcake, so I took the idea of her favorite things- peanut butter and chocolate- and they became cupcakes.  I was designing the idea for it in math class... so I had to be sneaky, otherwise she would figure out what I was doing since we have class together.  My math teacher wouldn't be inordinately pleased if she realized what I had been doing either.  Of course all my sneaking was for nothing, because I couldn't remember if she preferred chocolate or yellow cake so I had to ask her... thus basically telling her she was getting birthday cupcakes.


I used my favorite yellow cake recipe, and converted it to cupcake form.  I swirled peanut butter into the cupcakes before I baked them as well.  So you may want to add a bit more flour to the batter to make up for the added liquid, it just depends on recipe you favor.  I used the one from The New Best Recipe from America's Test Kitchen and Cook's Illustrated, my favorite/go to cookbook.  Its huge, a bit pricey, but amazing!  However I hate to make people feel pressured, so use your go to recipe for these cupcakes, and I'll stick with mine.


The frosting is simple.  Just melt chocolate, add peanut butter and about 1/4 cup of corn starch and stir!  And stir some more.  Still more... you may be tempted to add more corn starch until it thickens, but then you have a corn starch flavor lingering in your mouth after eating the cupcake.  Which, and if you've never experienced this flavor allow me to tell you, is never pleasant.  So stir, and resist the urge to add to much corn starch.  I made about a cup to a cup and a half of frosting, so if you are making a huge batch of cupcakes then go ahead and double the 'recipe'... if not, please be sparing with the cornstarch.


Of course after I add the writing, and have finished with my frosting.  In fact I'm preparing to put the frosting in the fridge, I realize Haley wasn't turning 18......... she was turning 17........  That cupcake got extra frosting........

Haley is 17!

Carrot and Parsnip Soup

I made this ages ago, when it was freezing and all I wanted was some hot soup! Unfortunately I've been busy lately so any one who actually looks to see what I'm up to is getting things a bit belatedly.... I decided to make this particular soup that day because my Dad had missed his mashed parsnips and carrots at Thanksgiving since the rest of us can't stand it.  So the dish was vetoed this year.  However I felt bad for him and decided to refresh the flavors a bit, and make the texture more to my liking.  And that's why this soup over any other.  Despite these being two of my least favorite vegetables, the soup itself was very good! Earthy and strong, with a bit of a kick from the vast amounts of Italian seasoning I used.  This is my adaption of the Vegetarian Times Creamy Carrot and Parsnip Soup from the January February 2012 magazine, which I some how got back in December...


I've changed the recipe a bit, because I don't like the taste of carrots that much.  So I wanted a bit more of the herb, fresh taste of the parsnips.  Thus, fewer carrots then the original recipe called for, more parsnips, and stronger herbs.

So here's my recipe:

Olive oil
2 large carrots
3 large parsnips
1 onion
4 cups of a vegetable broth
2 cups of water
1 cup of sun-dried tomatoes, roughly chopped
3 tsp. balsamic vinegar
1 tablespoon Italian seasoning

Cook the parsnips, carrots and onion on a high heat for 10 or so minutes.
Add the broth, tomatoes and seasoning.
Cover and bring it all to a boil.
Take half of the mixture and puree it, either a blender or a food processor works fine.
Add salt and pepper to taste, and then serve it up and enjoy!